 Tutorial: Standalone Video Logging - Part 1 - Setting up the Axis Camera
Tutorial: Standalone Video Logging - Part 1 - Setting up the Axis Camera
Tutorial: Standalone Video Logging - Part 1 - Setting up the Axis Camera
Navigate to the AXIS IP Utility that was downloaded and double click it to launch. The main Axis IP Utility window should now be open (See Figure 1).

Select the camera that needs setup by clicking on it, then open up the web portal for the camera by clicking on the 'House' icon (Figure 2 ![]() ).
If the camera does not show up, push the refresh button(Figure 2
).
If the camera does not show up, push the refresh button(Figure 2 ![]() ).
).

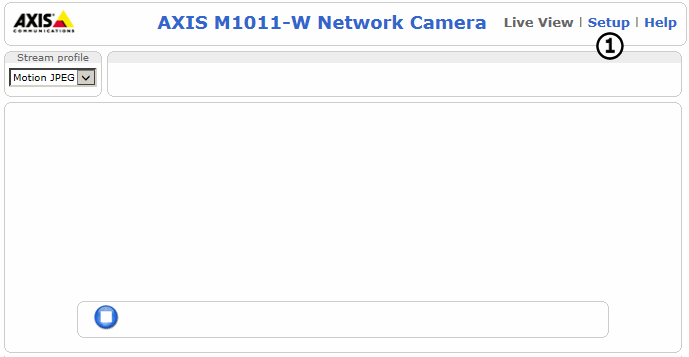
Once the webpage has opened, select 'Setup' in the top right corner of the screen (Figure 3 ![]() ). If credentials are requested, enter 'root' as
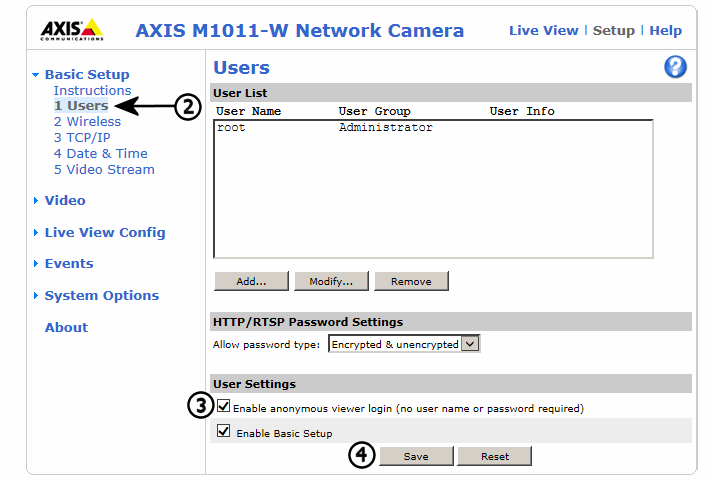
the user name and the password for the camera under 'password'. Once logged into the Axis dashboard click on 'Users' (Figure 3
). If credentials are requested, enter 'root' as
the user name and the password for the camera under 'password'. Once logged into the Axis dashboard click on 'Users' (Figure 3 ![]() ). Finally, check the box next to
'Allow Anonymous Login' (Figure 3
). Finally, check the box next to
'Allow Anonymous Login' (Figure 3 ![]() ) and click 'Save' (Figure 3
) and click 'Save' (Figure 3 ![]() ) at the bottom of the
screen. Wait for the page to reload before closing out of the window.
) at the bottom of the
screen. Wait for the page to reload before closing out of the window.
The AXIS IP Utility will be up after closing the web portal. Make sure that the same camera is selected, then click the networking button
(Figure 4 ![]() ).
).

In the 'Assign Network Parameters' window that pops up, click on 'Assign the following IP Address' (Figure 5 ![]() ), then fill in the form with the
following:
), then fill in the form with the
following:
IP Address: 192.168.2.X - The 'X' can be any number from 1 to 8 depending on how many cameras are being used.
Subnet Mask: 255.255.255.0
Default Router: 255.255.255.254
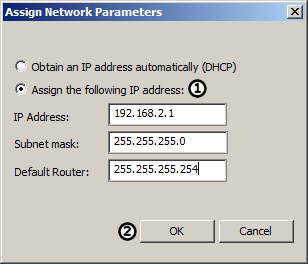
Finally, click OK (Figure 5 ![]() ). This will save the changes made to the camera making it ready for video logging.
). This will save the changes made to the camera making it ready for video logging.
If more than one camera is being set up, repeat the steps above for each camera. When this is complete, move onto the next part of the tutorial.