A complete message specification is the basic building block of a custom filter. In this part of Tutorial 1, you will create your own custom filter.
Select the Messages tab. When the panel opens, notice the Filter Bar that appears
automatically on the left side. This is a convenient way to turn on and off all sorts of filters you
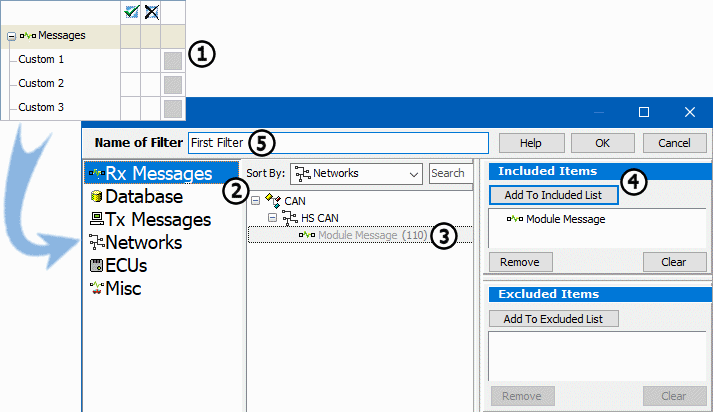
may use in your applications. Notice the "Custom 1" heading in the list and select the
small blank box to the right of the heading (Figure 1: ).
This opens up the Setup Filter dialog where filters are defined.

The Setup Filter dialog makes it easy to quickly set up a filter. At the left side of the dialog is
a list of message sources. This enablesaccess to messages defined in the Messages Editor, entered in
your database, etc. Make sure that the Rx Messages option is selected
(Figure 1: ). Notice that Module Message appears in
the list under High Speed CAN (Figure 1:
 ). Vehicle Spy
automatically places every message defined in its appropriate place to make workflow as efficient as possible.
Highlight Module Message and then click the Add to Included List button
(Figure 1:
 ). This adds Module Message to your filter.
When working with multiple filters, specifying names can help to keep things organized. Double click inside
the "Name of Filter" field and name this filter "First Filter"
(Figure 1: ). When finished, click the OK
button to return to the Messages view.
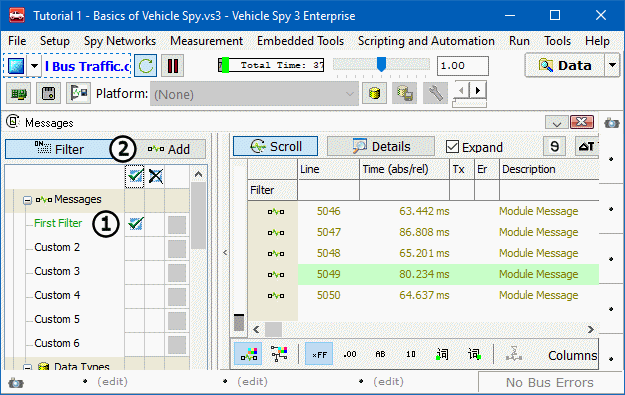
Now take a close look at the filter bar. The Custom 1 heading has been replaced by First Filter.
Make sure that Vehicle Spy is started and then click inside the first column to the right of the filter name
(Figure 2: ). A green check mark appears in the column, the
First Filter text turns green, and message traffic changes dramatically. Instead of seeing all messages on the
bus, only Module Message is seen.

If extra custom filters are needed, the Add button above the filter bar
(Figure 2: ) can be clicked to create extra custom filters. Extra custom
filters can be removed by right clicking on the filter and selecting Remove Message Filter.
When using filters in Vehicle Spy, messages can also be excluded. In order for this to work properly, something
must always be included before exclusion is possible. Vehicle Spy looks for included messages first and then excludes
from that list. For example, removing our Module Message from the message traffic. First place a green checkmark next
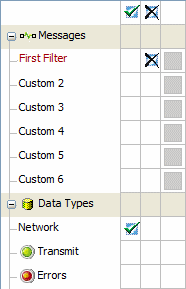
to the Network heading (Figure 3: ) under Data Types
in the Filter Panel. This will filter to include all network traffic. Next click in the second column to the right of
the First Filter heading (Figure 3:
 ). An X fills the column,
First Filter text is now red, and Module Message is excluded from the message traffic.

Experiment with the Filter panel for a little while. Try including all network traffic and then excluding all HS CAN messages. Try to include all HS CAN messages and exclude Module Message. The Filter panel provides endless ways to customize the view of the data.