
|
neoVI 3G Explorer |
neoVI 3G Explorer configures essential parameters in neoVI PLASMA to ensure that it works correctly during any mode of operation.
Parameters include its firmware, real time clock (RTC), and vehicle network baud rates, among others.
neoVI 3G Explorer MUST run on a PC connected to the neoVI PLASMA via
the USB to PC port.
Android
Slave VNET Settings Last Update:
Monday, April 22, 2013
Open neoVI 3G Explorer on a PC
One way to open neoVI 3G Explorer directly is to click on it in this folder:
The other ways to open neoVI 3G Explorer are by opening Vehicle Spy first, then clicking the  Hardware Setup
Use neoVI 3G Explorer to Configure neoVI PLASMA
Firmware
After 3G Explorer is open the VNET will show up in the tree on the left (Figure 1:  ).
Clicking the Connect button (Figure 1:
).
Clicking the Connect button (Figure 1:  )
will connect to the device and read its current settings which will be displayed in the area on the right.
The status window (Figure 1:
)
will connect to the device and read its current settings which will be displayed in the area on the right.
The status window (Figure 1:  )
will indicate any issues while connected to the VNET.
The firmware versions are displayed on the right (Figure 1:
)
will indicate any issues while connected to the VNET.
The firmware versions are displayed on the right (Figure 1:  )
and appear as black text if up-to-date and red text if out of date.
If needed, the Manual Reflash button will update the firmware.
)
and appear as black text if up-to-date and red text if out of date.
If needed, the Manual Reflash button will update the firmware.
Network Settings
To adjust a network setting, like baud rate, click on the proper network in the tree and the area on the right will refresh to show the related settings that can be
adjusted.
Make sure to click the Write Settings button (Figure 1: ) after making changes to push those new settings into neoVI PLASMA.
If you make a mistake while changing settings you can click the Load Defaults button (Figure 1:  ) to reset ALL 3G Explorer settings in neoVI PLASMA back to their defaults.
RTC Time
Click Read RTC (Figure 1:  ) to see the current time of the neoVI PLASMA Real Time Clock.
Click Synchronize RTC re-sync the neoVI PLASMA RTC time to the current PC clock time.
) to see the current time of the neoVI PLASMA Real Time Clock.
Click Synchronize RTC re-sync the neoVI PLASMA RTC time to the current PC clock time.
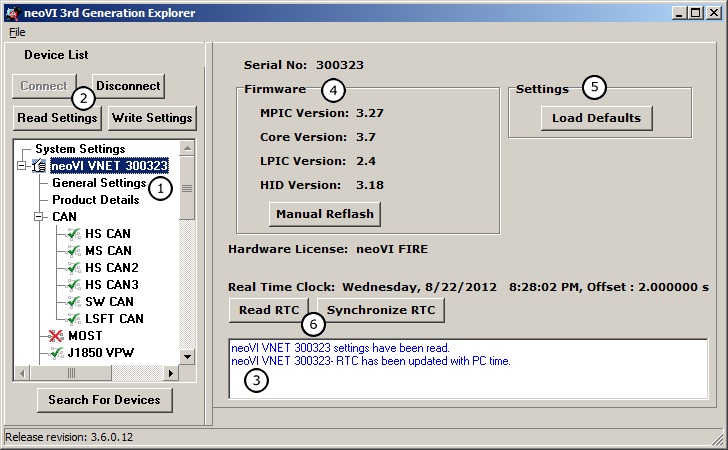
Figure 1: Use neoVI 3G Explorer with PC USB to configure essential parameters in neoVI PLASMA.
If necessary, the neoVI PLASMA's Linux operating system can be updated using 3G Explorer.
To flash the device, the USB to PC and USB ICS mfg ports must BOTH be connected at the same time between neoVI PLASMA and the PC for this update to work.
After everything is setup, open 3G Explorer on the PC, go to the Android branch, and click the Update to... button (Figure 2) to start the update.
The Send Message Events to Android checkbox (Figure 2) should remain disabled.
This option is for future applications for the neoVI PLASMA.
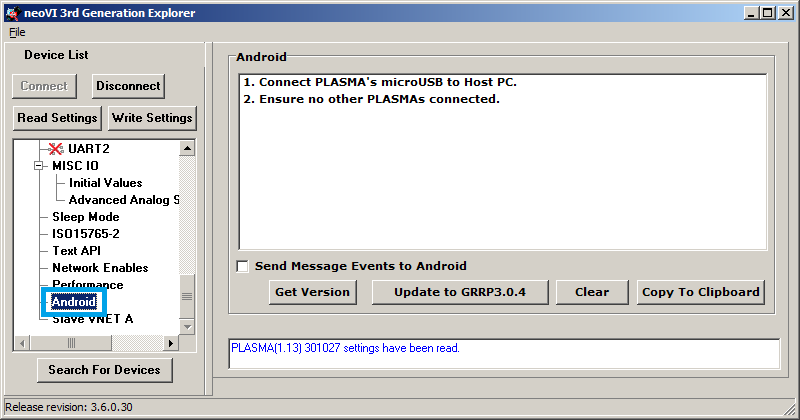
Figure 2: The neoVI PLASMA Linux can be updated using 3G Explorer.
These settings apply if your neoVI PLASMA has slave VNETs installed (Figure 3).
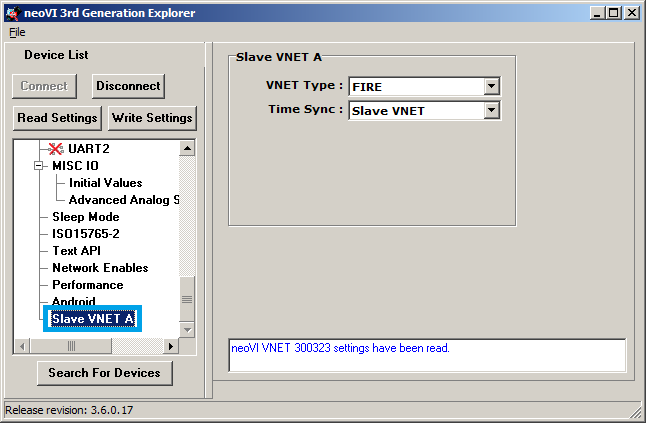
Figure 3: Don't forget slave VNETs have settings too!
 neoVI PLASMA Documentation - (C) Copyright 2019 Intrepid Control Systems, Inc.