![]()
|
WN Website: PLASMA WirelessNeoVI Settings |
A WirelessNeoVI application running on the logger controls all wireless operations.
This application has many settings and an activity log scheduler that can be viewed and changed remotely using the website.
Change the Logger's WirelessNeoVI Settings
Last Update:
Thursday, May 9, 2013
View the Logger's WirelessNeoVI Settings
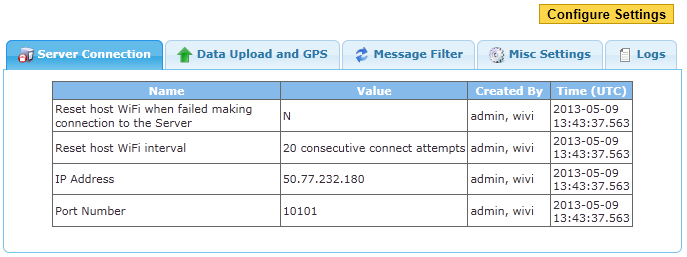
On the Device Details page, the PLASMA WirelessNeoVI Settings button opens a page similar to Figure 1 that shows the current settings and activity log schedule.

Figure 1: The WirelessNeoVI application running on the logger has many settings.
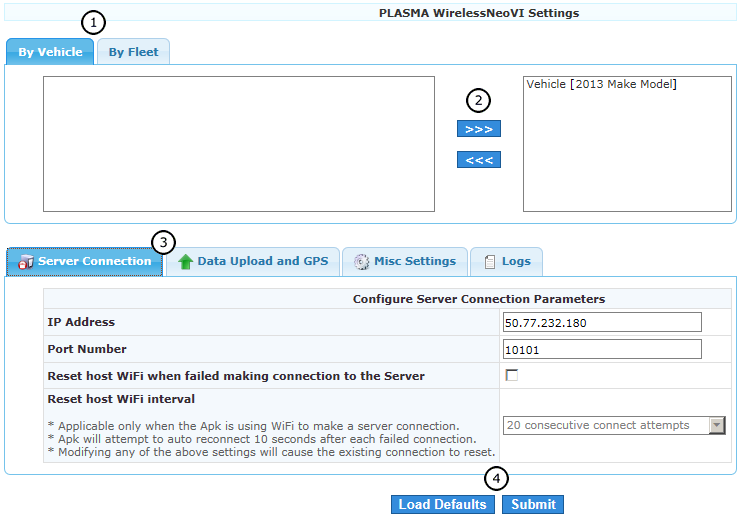
Click the Configure Settings button in Figure 1 to open a page similar to Figure 2.
This allows the settings and activity log schedule to be changed for one vehicle logger or an entire fleet of vehicle loggers.
Use the By Vehicle and By Fleet tabs (Figure 2:  ) to select which vehicle or fleet of vehicles will get the new settings.
The left side is a list of choices and the right side shows which choices have been made.
Use the >>> and <<< buttons (Figure 2:
  ) to make and remove selections.
USE EXTRA CAUTION IF UPDATING AN ENTIRE FLEET.
After selecting which loggers to change, use the tabs at Figure 2:  to find the various settings and make changes.
After all changes have been made click Submit (Figure 2:
  ) to send all changes to all selected loggers.
The Load Defaults button changes all WEBSITE settings on all tabs back to their default values.
The Submit button must still be clicked to send those default values to any selected loggers.

Figure 2: The WirelessNeoVI application settings on the logger can be changed remotely using the website.
![]() neoVI PLASMA Documentation - (C) Copyright 2019 Intrepid Control Systems, Inc.
neoVI PLASMA Documentation - (C) Copyright 2019 Intrepid Control Systems, Inc.